Master class on stamping
The long-awaited master class on stamping!
 Happy Halloween to all who celebrate this holiday!
Today I want to talk in detail and show how I do the stamping. You will see that the stamping is quick and easy when you consider some of the nuances.
Before you sit down to apply the pictures, make sure the base coat is completely dry, otherwise you can damage the coating, turning it into an accordion.
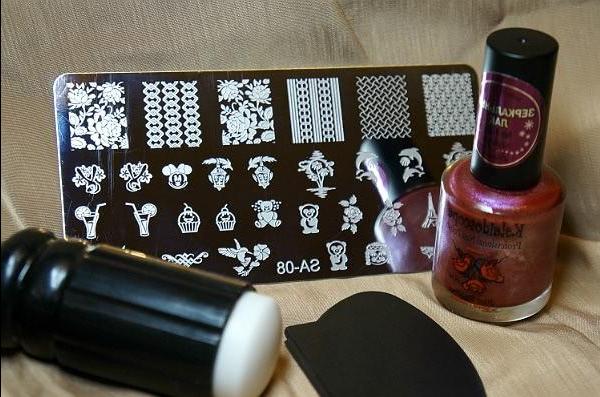
1. Before first use you need to remove the protective film from the disk or plate. The film is transparent blue or colorless. I use the tiles in the Sunny Apple SA-08.
2. For stamping you can use not only special, but also nail polishes, as long as they were well pigmented. Perfect all paints Kaleidoscope from the "Mirror Polish". For this manicure I took Kaleidoscope "Mirror Polish" f-05.
3. Wipe the plate and stamp nail varnish (hereinafter IDSL) without oil, otherwise the paint just slide on the greasy film. The presence of acetone doesn't matter if bezatsetonovymi IDSL quickly removes varnish, it is also quite suitable. You can use JDSL with glycerin – it leaves a whitish coating on the plates, but does not interfere with the stamping. It is also important to thoroughly wash hands with soap before the "procedure" that the nails were not greasy, such as creams, otherwise, the picture just does not stick or wrap the pieces.
4. Apply the varnish to a drawing. Confident and firm movement to wash the excess varnish scraper. The scraper should be kept under an approximate angle of 45 degrees. The pressure should not be very strong, otherwise you will remove too much Polish, and in illustration almost nothing left.
5. Perekidyvaem pressed or stamped in pattern. The pressure should not be too strong and long.
6. Quickly check if everything was well stamped. If the result is not satisfied, it is better to redo than to go unhappy with the failed drawing. It happens that the engraving on the disk/plate is good, but the lines are so thin that the varnish dries too quickly it is impossible to make a clear fingerprint image. To avoid this, wipe the drawing EDSL, so that left a bit, then apply thickly to the nail and swipe 2-3 times with a scraper. Thus, JDSL will not let the varnish dry quickly. As a rule, varnishes metallics and thick shimmer more manageable for stamping than lucky-creams.
7. Rolling motion draw the figure on the nail. To transfer the drawings on the nails with silicone dies recommended by compression, otherwise the picture may be distorted because the surface of the pads is very plastic. If the picture on the stamp is well tolerated, but on the nails is not printed or only parts, the paint has already time to dry. You should do everything a bit faster, consider in advance how you want to position the pattern so as not to twist the rubber stamp in the hands extra precious seconds. Either on the nails, greasy (see point 3). If desired, repeat steps 3-7 for the other nails.
8. If part of the image gets on the skin, then wipe it off with a brush or a cotton swab dipped in JDSL.
9. The last stage is the consolidation pattern. For a long time to wait when the figure dries, it makes no sense – after a maximum of a minute, he is already completely dry. It is important to choose the right top it should be gel-like and thick. Apply the nail Polish 2-3 movements, without touching a brush pattern, so as not to smear it. Allow the top to dry and beautiful and spectacular manicure is ready!
To decorate the nail with a single figure, we need only about 30 seconds. If you put patterns on the entire nail, most of the time to remove excess Polish from the skin. So for the decoration of all 10 nails I usually spend a leisurely 15-20 minutes. That's much faster than drawing something similar by hand, especially if not studied before in art school.
The stamping can highlight just one nail, as I showed in the master class.
Or, conversely, leave only one nail without a pattern (more about this manicure I wrote ).
Or to put patterns on all the nails (for details, look in ).
Or to create a fashion lunar manicure (my story on this ).
And many, many more! The number of options is limited only by the imagination! And what I especially like about the stamping, which does not require drawing skills, drawings are the same and smooth even on the right hand. With only one small disc on the 11 drawings I can think of dozens of different manicures by combining the base combination of colors/pattern and changing its position on the nails. What can we say about plate more! Besides, unlike labels that only once, it is always possible to repeat a favorite picture again, taking the varnish of a different color, and get something completely different!
I hope that my post helped someone to understand the intricacies of stamping or to discover a new quick and easy way to decorate nails.
Thank you for your attention!
#of disinvolta #swatch #stamping #of uacdisablenotify